Installation
- I am running as a non-administrator account; can I still install DinoCapture2.0?
- As long as you have the administrator privilege, you are able to perform the installation.
- An error (-5001 0x80070002) has occurred during installation. What can I do?
- Active firewall or antivirus software may prevent DinoCapture 2.0 from installing properly. Try to turn off your firewall or antivirus software temporarily when you install DinoCapture 2.0. Remember to turn your firewall or antivirus software back on when you have successfully completed the DinoCapture 2.0 installation.
- When do I need a driver to operate my Dino-Lite?
- For Dino-Lite AM211, AM310, AM311 series, Dino-Lite Plus series (AM3XX), and Dino-Lite Pro series (model number AM4XX/AD4XX/AMH), specific driver is needed to operate the device.
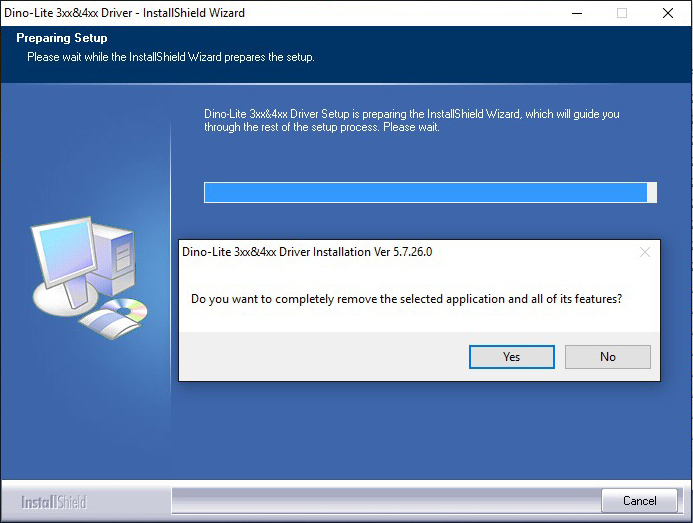
- I get a removal message when I am installing the driver. What’s wrong?
- It is most likely that you had ever installed the driver. Please click No if you do not intend to remove the driver when you see the following message.

- I am installing the driver with Windows 8/Windows 10 and get an error message. What should I do?
- Since some of the Dino-Lite drivers are not digitally signed, Windows 8 and Windows 10 are not able to load the driver with its default setting. To resolve the error, you will need to disable the driver signature enforcement.
To disable the driver signature, please follow the Driver Installation for Windows 8 or Driver Installation for Windows 10.
- How do I arrange a silent (unattended or automated) DinoCapture 2.0 installation?
- To prepare the silent installation, please follow the Silent Installation Instructions.
Troubleshooting
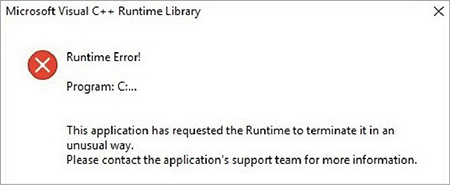
- I get a ‘Stop Working’ / ‘Runtime Error’ message while I am starting DinoCapture 2.0. What should I do?
- If the following message appears while you are opening DinoCapture 2.0, please try the following solutions.


- Install the latest version of DinoCapture 2.0.
- If the problem persists, please press Ctrl + Shift and double-click on the DinoCapture 2.0 shortcut to reinitialize the software.
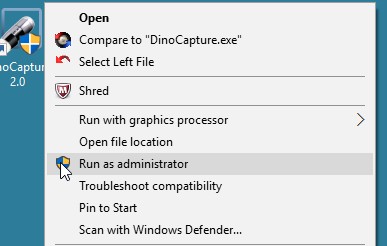
- If the software still not working, please try to right click over the DinoCapture 2.0 shortcut, and click Run as Administrator.

If none of the above solutions solve the problem, please contact us or your local distributor for further assistance.

- There is no response when I open DinoCapture 2.0. What should I do?
- Press Ctrl + Shift + Esc to open the Windows Task Manager, then select the Processes tab. Look for and click DinoCapture.exe, and then select End Process.
- Why doesn’t the preview window show as I open DinoCapture 2.0?
-
The default position of the DinoCapture 2.0 preview screen is set as undocked. There is a possibility that the preview window had been moved off screen unintentionally when you used the software last time.
To get the preview window back on screen, you will need to change the default setting of DinoCapture 2.0 by following the below steps:
- Close DinoCapture 2.0 if it is currently opened.
- Select Start Menu > Documents, and open the Digital Microscope folder > Setting folder.
- Open the file DC20.ini in a text editor.
- Change the line from “Save_Preview_Window_Position=on” to “Save_Preview_Window_Position=off”.
- Save the changed file, and reopen DinoCapture 2.0.
- The Microtouch, LED on/off, or AE (Auto Exposure) functions does not work properly on DinoCapture 2.0. What’s wrong?
- A possible reason is that the digital microscope may be interfering with your PC’s webcam. Try to disable the webcam temporally.
- One or more camera windows are completely blackened while multiple Dino-Lites are connected to the PC. What’s wrong?
-
This issue may occur when the USB bandwidth is not enough for the USB devices. To cope with the limitation of USB technology, there are two quick solutions:
a. Lower one of your microscope’s resolution.

b. Connect your USB camera to a different USB hub.
- The auto-update functionality of DinoCapture 2.0 does not work. What’s wrong?
- The auto-update functionality could only be worked under the administrator mode. Right click over the DinoCapture 2.0 shortcut, and click Run as Administrator.
Measurement
- How to Calibrate Measurements?
-
Calibration, a build-in function of DinoCapture 2.0 and DinoXcope, is a tool that helps Dino-Lite users to get a more precise measurement outcome. Calibration function supports Dino-Lite models that has measurement function (excluding AM313).
Followings are the calibration setup steps that could help you produce the best possible measurement result:
-
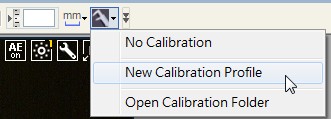
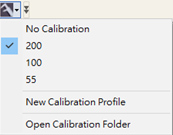
In the preview window, select the Calibration
 button, and select New Calibration Profile in the dropdown menu.

-
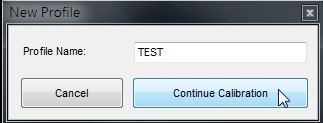
A naming window will popup. Give the calibration profile a name, select Continue Calibration.

-
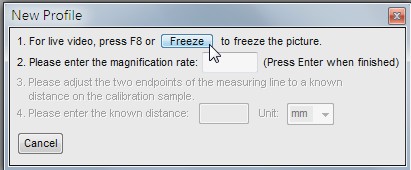
A Calibration Profile window will appear to guide through the calibration process. Place the magnification sample provided in the Dino-Lite package under the microscope, and adjust your Dino-Lite’s magnification and focal length.
Freeze (or press F8) the preview window when the adjustments are determined.
-
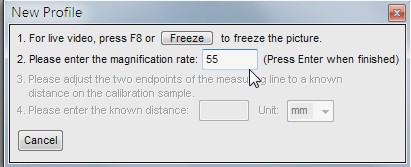
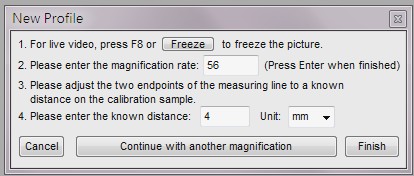
Enter the magnification rate, and press Enter when finished.

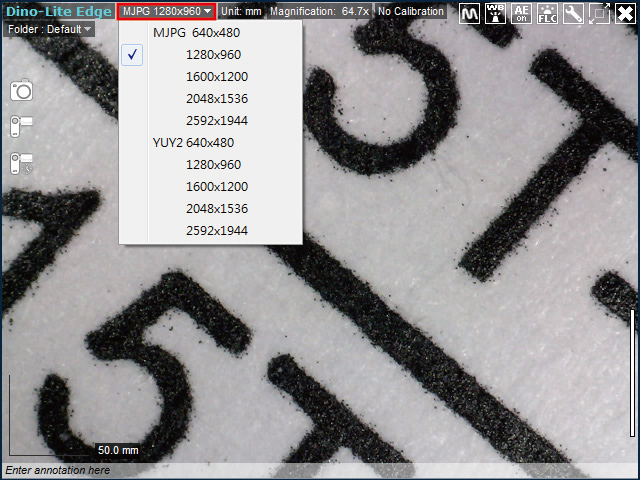
Note: Magnification rate can be read on the Dino-Lite’s magnification scroll. If your Dino-Lite supports Automatic Magnification Reading (AMR) function, the magnification rate will display on the software’s Magnification Input section.
-
A calibrating reference bar will appear. Hold and place the two blue endpoints of the measuring line to a known distance. To achieve better calibration result, it is suggested to calibrate the target as long as possible. As in the image shown below, calibrating on 4mm will be better that on 1mm.

-
Enter the distance, and select a proper unit.

- You may press Finish to end the calibration setting, or you may also select Continue with another magnification if you wish to create a multiple points calibration profile.
Single point calibration could have best accuracy at the magnification it is calibrated.
A multiple points calibration would have better coverage over the range of magnification rate it is calibrated. When performing a multiple point calibration profile, the magnification rate of the calibration point must be conducted in a sequential way, either from low to high, or from high to low. It is also suggested not to calibrate with the magnification rates too close. - Now, you may choose to measure with one of the saved calibration profile, or without calibration. Once the calibration profile is selected, the name of the calibration will be shown on the preview window, and the magnification rate shown on the preview window is also calibrated.

-
In the preview window, select the Calibration